Tippett 404 Coupe Restoration
- Mike Tippett
- Jun 20, 2017
- 4 min read
One thing I have learned about embarking on a restoration of a 404C is that if the slightest sign of rust bubbling is evident on any visible panel, it’s perforated and probably much worse and more extensive that you think! The first 404C I had was a lot rustier than this one. I went into this restoration with my eyes wide open….
This car has a full history and has never been in a collision. I had an estimate of $50K plus tax CAD at Coachwerks of Victoria BC for the work – the shop had budgeted 300 hours for metalwork and 200 hours for body preparation and paint. Now, very near the end, it seems as though this estimate will be correct.
One thing that certainly helped along in the metal repairs was all the NOS panels I had accumulated. Pat, the metal master, told me that just when he thought there would be a really difficult bit to make, I usually had the OE part :
L and R front fenders
L and R rear fenders
R sill/rocker panel
L and R half floors
L and R floor buttresses
L and R rear jack mounts
L and R shock tower reinforcements
Engine hood, inner headlight circles, plus a few smaller pieces
Cross member
I had only two weeks to strip the car to the bare shell and get it to the restoration shop. The scope of work was to rebuild the body and paint the resulting shell, carefully fitting the trim during final preparation before painting to make sure the end result will be superb. The car was left on its suspension with the gearbox removed and the torque tube head held to the transmission mount with short bolts and nuts.
The first step was to get the car to the media blasting shop. That work cost about $3400 CAD, for stripping the entire shell and all the opening panels plus all the NOS panels. Coachwerks in the strongest terms possible recommends against stripping the shell chemically in an immersion bath, as the aftermath is really quite bad. The shell then went back to Coachwerks where work began.
With the C models (Cabriolet and Coupé), the shell is entirely welded together, including the front fenders. This certainly gives sedan and wagon owners better access to the inner fenders, strut tower reinforcements and related areas. However, removal of rear fender skins is required to properly get at the rear jack mounts and inner wheel wells.

The car was mounted to a rotisserie and the floors were cut completely away, leaving the transmission tunnel intact (above).

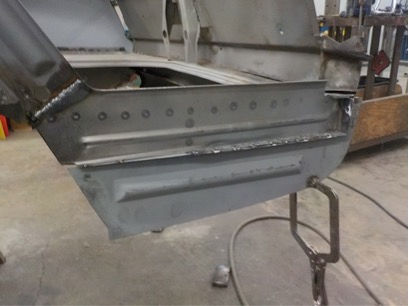
After tidying up the areas that connect to the floor, as well as the leading edge of the sills, the floors were welded into place with a combination of plug welds and spot welds (above).

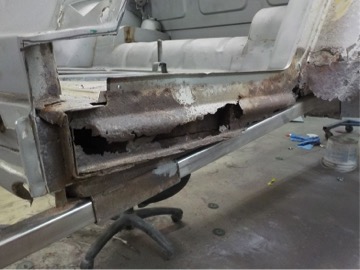
The right sill/rocker panel, after opening up and welding repair sections in (above).
The outer sill panel was then spot welded into place and closed up, with the anchoring points for the new floors ready to receive the new panels. The floor flanges are welded to the lower flange of the sill panels.

In this photo (above) you can see the right seatbelt mount in copper primer and the inner sill reinforcements readied for the new floor, to which they are all welded.

Floors, buttresses and sills all together again (above).
Once these core structural members of the car had been repaired, the work on the peripheral elements could begin. First to be done were the rear fenders, jack mounts, inner fenders and related areas.
With the right rear fender skin off, the extent of damage will be revealed; in this case it was somewhat shockingly bad! Steel tubing running through the jack mount was welded to the front of the rear wheel wells to hold the shell on the rotisserie (below).
After the main elements were replaced, it looked a lot better and can once again lift the car! Two more fabricated panels were made up to complete the lower inner fender and then the new skin was welded on (below).

The other side was similar and also needed some new metal near the gas tank (below):

With the rear done, onto the front. The strut towers in 404s frequently have innocent-looking small areas of rust bubbling in that area. This is because the skin that you see in the engine compartment is doubled by a very thick reinforcement plate underneath and in between the two panels, water, salt and dirt gets in there. The only proper solution is to remove the reinforcements and repair the skin. After treating the replacement panels, they are welded back together (below).
New old stock strut tower reinforcement plates above. The skin seen in the engine compartment is above these. After repairing and welding the inner skin back into place, the reinforcements were welded on. With the front fenders off, additional rust repair work was done in the chassis member just outboard of the strut mounts (below).

Both sides were done this way. Meanwhile, some rot was evident in the Panhard rod mount, so it was cut away and replaced with new, thicker metal (below).

The nose panel also had rust where the inner fenders have a foam rubber seal so this was repaired on both sides (below).

Then there was some work on the inner left front chassis rail, which was corroded due to the battery being located above it (below).

Finally the metalwork was completed, after the hood latch area was replaced. Then onto the body preparation for painting…..a chapter for another day……


Comments